Kloxo-MR adalah salah satu kontrol panel webserver hosting gratis yang mempunya fitur lengkap dan mudah untuk dikonfigurasi dari pada Koxo official karena terdapat beberapa pilihan webserver sesuai dengan kebutuhan. Kloxo-MR sendiri dikembangkan oleh orang indonesia yang bernama Mustafa Ramadhan, walaupun gratis tapi fitur dan kemampuannya tidak kalah dengan kontrol panel berbayar seperti cPanle, Plesk Panel dan DirectAdmin. Kloxo-MR sekarang sudah bisa diinstall di centos 5 atau centos 6 baik 32 bit maupun 64 bit.
Fitur yang paling menonjol dari kloxo-MR dibandingkan Kloxo Official adalah adanya pilihan webserver seperti lighttpd, apache, nginx-proxy, nginx, dan lighttpd-proxy. Untuk php branch tersedia beberapa pilihan seperti php53, php53u dan php54, yang tidak kalah menarik Kloxo-MR mempunyai beberapa pilihan php type seperti mod_php, suphp, php-fpm, fcgid dan berbagai turunannya juga terdapat opsi dual-php. Dilihat dari fitur di atas, user Kloxo-MR akan bisa lebih mengembangkan dan melakukan konfigurasi sesuai dengan kebutuhan webnya masing-masing agar menjadi lebih efisien dan lebih canggih.
Berikut adalah Cara Install Kloxo-MR Final:
Pertama masuk ke root SSH bisa menggunakan aplikasi Putty atau Bitvise SSH Client, saya sendiri lebih suka pakai Bitvise SSH Client kerena bisa copy paste. (note: untuk perintah di SSh tanda “#” tidak termasuk)
# cd /
Jalankan perintah di bawah untuk update centos ke versi yang terbaru
# yum update -y
Install beberapa paket yang dibutuhkan untuk kloxo-MR
# yum install yum-utils yum-priorities vim-minimal subversion curl zip unzip -y
# yum install telnet wget -y
# setenforce 0
# echo ‘SELINUX=disabled’ > /etc/selinux/config
# cd /
Download repo kloxo-MR untuk versi final atau terbaru
# wget https://github.com/mustafaramadhan/kloxo/raw/rpms/release/neutral/noarch/mratwork-release-0.0.1-1.noarch.rpm –no-check-certificate
# rpm -ivh mratwork-release-0.0.1-1.noarch.rpm
# yum update mratwork-release
move to /
# cd /
Update mysql karena Kloxo-MR membutuhkan mysql/mariadb version 5.1++
# yum clean all
# yum install yum-plugin-replace -y
# yum replace mysql –replace-with=mysql55 -y
# chkconfig mysqld on
Install kloxo-MR
# yum install kloxomr -y
# sh /script/upcp
# reboot
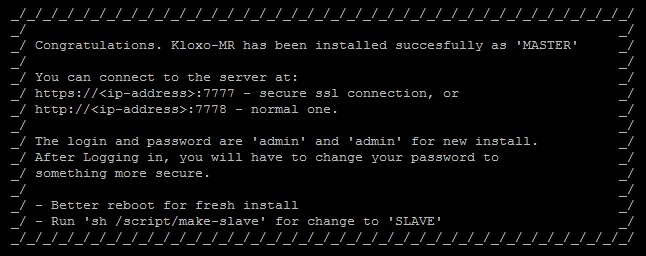
Selesai sudah cara install kloxo-mr final, sekarang anda bisa memulai konfigurasi webserver kloxo-MR . Untuk pertama kali masuk Kloxo-MR, buka browser ketik alamat IP:7778 lalu login menggunakan user: admin dan password: admin.
Setelah itu pastikan port 7777/tcp dan 7778/tcp terbuka , dan biasanya default CentOS masih tertutup maka kita harus membukanya, kalau tidak kita buka menurut pengalaman beberapa kali install saya gagal terus. ketikkan perintah berikut di Console SSH :
# iptables -I INPUT -p tcp –dport 7777 -j ACCEPT
# iptables -I INPUT -p tcp –dport 7778 -j ACCEPT
baru di restart : service iptables restart
Taraaaaa KloxoMR sudah bisa di akses
 Kloxo-MR is a decent free to use control panel to run your web hosting server. Below are the easy steps to install Kloxo-MR on a CentOS 6.4 server